
MEMORY PRESERVATION: LEARNING THE BASICS OF FOREVER STORAGE – The Gallery
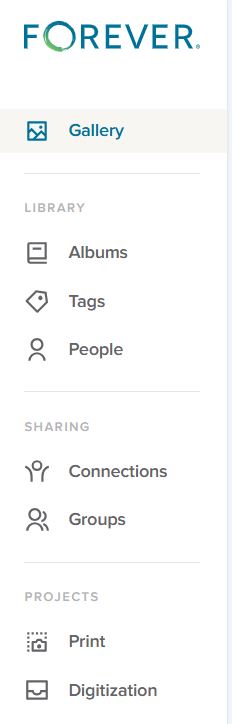
FOREVER’s Main Menu
The menu you see on the right is the basic menu of your FOREVER Storage. Whenever you are in your personal storage account, this is what you will see on the left hand side. Some of the terms may seem familiar to you from other websites you’ve been on and chances are the uses are similar, but let’s make sure they actually mean what you think, because originally I assumed I did, and I was wrong.
The Gallery
In FOREVER land, all of your photos, videos and documents live in your Gallery. You have other tools like Albums, Tags and People to organize your access to these images, but the images don’t actually go there. They stay in the Gallery.
I didn’t understand that at first. I thought the Gallery was a place and Albums were a place and I didn’t need the items in two places. So, after I uploaded the first photos and put them in an Album, I deleted them from the Gallery. WRONG! Then I had an empty Gallery and an empty Album.
Thankfully, the Delete Bin stores deleted items for 30 days. I restored those I’d deleted to the Gallery, added them back into the Album and realized I’d learned an important lesson. Galleries on other sites work the same way, but I wasn’t familiar with them, because the only place I’d stored photos in the past was on my computer.
Images are added to the Gallery in two ways. In the upper right hand corner of the Gallery page is a blue Upload button to add images manually or the images can come there through the free FOREVER app, which can be set to automatically synch with Storage. Whether images are added manually or automatically, the Gallery will automatically sort them by the Date Uploaded (Newest First).
Beneath the word Gallery on the left side of the page (next to the Main Menu) there’s a Filter button and it will open up the Filter Menu, (illustrated below) which allows sorting by a wide variety of values.

The Favorites button will hide all images which have not been selected as a Favorite. Any image can be made a Favorite by double clicking the image to open the Lightbox and once there clicking the heart in the top row.
The Sort By button tells FOREVER how you want to see the images in your Gallery. As mentioned the automatic choice is Date Uploaded (Newest First). The other choices are Date Uploaded (Oldest First), Date Taken (Newest First), Date Taken (Oldest First), Names (A-Z), Names (Z-A), and File Size (Largest) or File Size (Smallest). At first you may wonder why they have so many choices. In part, that’s because people have different preferences, but the more I use my account, the happier I am FOREVER gives me so many choices.
Sorting by Media Types shows only one type of media at a time and the selections are Photo, Video, Audio, Document and Project. Date Taken allows you to pick a Date Range, from 2 days to whatever you need. People, obviously allows only images of the person you choose to show, but you will have to have set up people albums to select them from (which we’ll talk about another time). Tags works the same way as the People filter, but with Tags rather than People. Albums works like People and Tags with the Albums you set up.
The bottom two buttons – Not In Any Album and Not Tagged – are my favorites, because I try to keep my images organized in Albums with Tags. With those buttons I can quickly see how far behind I am, because it will show me just those images I need to work on.
Now, the real magic happens when you start getting fancy. You can mix & match the filters, choose more than one person, pick a date range and more – all at once. The more you narrow it down, the fewer images you see.
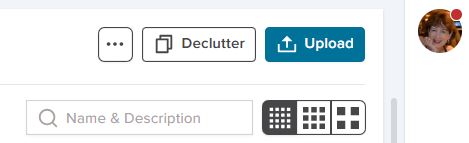
We’re almost through, but before I finish, I wanted to show you these last few buttons on the Gallery Page.
The box with the three buttons let’s you View a Slideshow. Now you can see why the filters can be so great. You could select just the images from a vacation you just had, hit the slideshow button, sit back and enjoy. The box will also give you automatic access to the delete bin, if you need it.
Declutter is something for another day, but it’s a great tool, and I’ve already told you how to use the Upload button.
The search bar allows you to search by text for a photo. Let’s say you know you had several photos you named “Bob’s Graduation”, but you weren’t sure exactly what album they were in. Just type “Bob’s Graduation” in the box and it will find the images.
That bar with the dots in them selects the size of the images in the Gallery. The more dots, the smaller the images. The less dots the larger. You’ll love that the thumbprints show the full image with orientation, not just some sliver or portion.
