
MEMORY KEEPING 101: NO BIRDS IN THESE NESTS
Using Online Albums to Organize Your Photos
There are no hard and fast rules for creating albums in your FOREVER storage. You determine how you want them set up. You can set them up based on the subject matter, the time frame or the people. You can have as many or as few albums as you want and you can nest albums under the top level album for as deep as you’d like.
Some people keep photos strictly by date – with each year being an album, with nested albums for each month inside that and then an album for each day/event within the month. Others focus more on families, having one album for their immediate family, one for their own extended family and another for their spouse’s family. Perhaps the nested albums inside that would be by years or it could be broken down by people.
My choice is to have one album for travel and another for day-to-day activities. In the travel album, I have an album for each vacation. In my day-to-day album, the nested albums actually correspond to the various traditional scrapbooks I have created on a annual basis, but according to the scrapbook, it could be one year or multiple years. Then I have an album for all my completed FOREVER Projects and another for my Memory Keeping business.
I’m sorry this post is so long, but I wanted to include all the pertinent information in the same place and there’s a lot of it.
The Top Bars
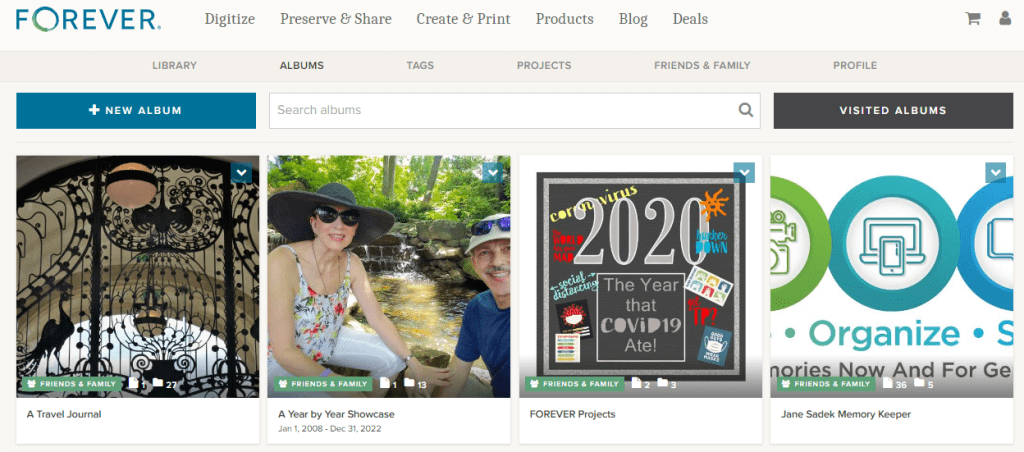
Looking at my album page above, you can see that it’s easy to access any place on the FOREVER site with the click of a button. Click “FOREVER” and you will be on the FOREVER Home Page. You can shop FOREVER by clicking Digitize, Preserve & Share, Create & Print, Products or Deals. “Blog” will take you to the FOREVER Blog, which has an encyclopedic reference library of posts dealing with everything from new products to how-to’s. You can go to your shopping cart and also take a look at your account.
In the row below that, you have access to your Library, your Tags and your Profile. There’s also a link to your “Friends & Family.” Friends & Family are the folks you have chosen to share your photos with. We’ll talk about that more later.
Finally, you get to items specific to Albums. You can add a New Album, Search the Albums you have or take a look at Visited Albums. We’ll take a deeper look at Visited Albums later, also.
In the middle of the bar below these options is a Search Bar which allows you to use keywords, names and such to find specific images in your storage.
+ New Album
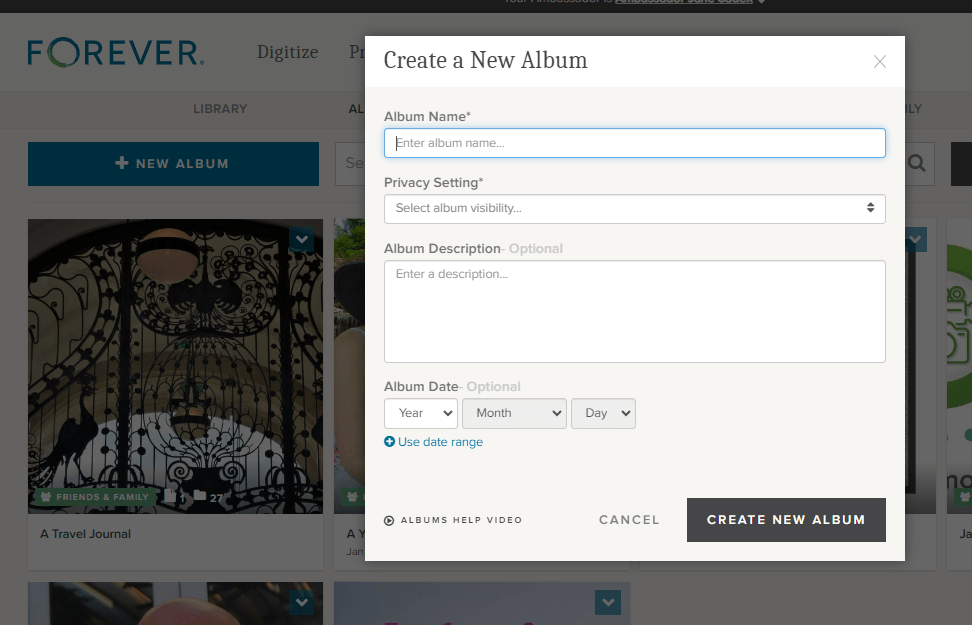
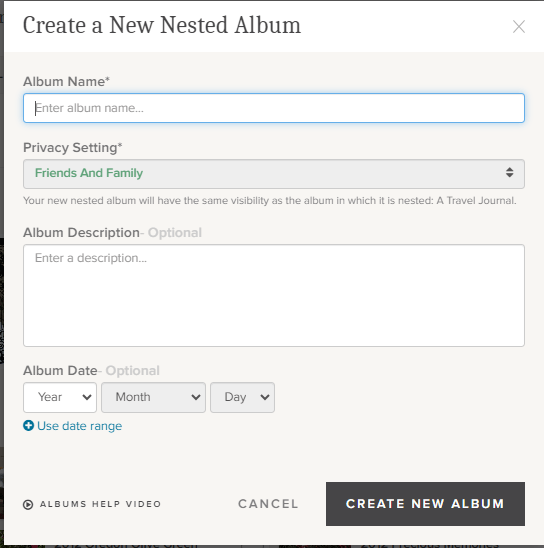
Hit the blue “+New Album” button and this “Create a New Album” dialog box will pop up. “Album Name” is the title you want for your album. You must create this name and it will show up below the photo you choose as a cover image for your file. For instance, below the photo with the ornate iron gate, I named my album “A Travel Journal.”
There are three Privacy Settings available and you must select one for each album. This will indicate who can see these albums in your storage. The privacy setting you chose for the top level album will apply to all the nested albums.
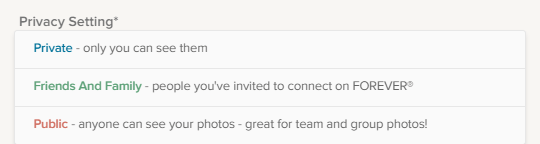
“Private” means for your eyes only. The only people who will be able to see these files is you, someone you have allowed to sign in with your credentials or anyone you have designated as a manager for your account, if you have chosen for your manager to have that sort of access. You can create a link and share the file, but it will not automatically be available to anyone else unless you decide to.
“Friends and Family” are people you want to have access to the images in your storage. They are completely under your control. You can invite them when you want to and take them out of Friends and Family at your discretion. However, if you would like for them to collaborate on an album with you, you must share the file with them, using the “Share” button. Then they can add photos to a file, but they still cannot modify the photos. They would need to be a manager for that.
“Public” means your files are accessible to anyone on the internet. This is not what most people want, but it could be what you want. You could set up a portfolio of projects you wanted the public to have access to or training films for your customers or even, like one of our users, a historical album of his service in WWII. The WWII Vet did not have any family who was interested in his photos, but he thought they had historical significance, so he wanted them to be available to anyone who was interested.
“Album Description” gives an overview of what’s in the album. You don’t have to put anything here, but if you are giving access to other people or you are setting up an archive which will be used for generations to come, then the more you include the better.
“Album Date” can be a single date or a date range. You do not need to fill this in at all, but as with the description, this information could be invaluable to future generations.
Then there in small print is access to “Albums Help Video.” You’ll find these helpful videos all over FOREVER. Anytime your stuck, just look around and chances are you will see a link like this. https://www.forever.com/app/users/jane-sadek–1/albums/travel/4x8ql6f7rc4gm8z183zp34r17
“Visited Albums”
So, remember when I said you could share your albums with others and allow them to collaborate in those albums. There are a wide variety of uses for this feature, from a network of family albums to a team, club, business or other organization which uses a central FOREVER account. If you are a FOREVER customer with this type of access to other accounts, then this is where you would go to visit those albums which you had looked at before.
Individual Album Options
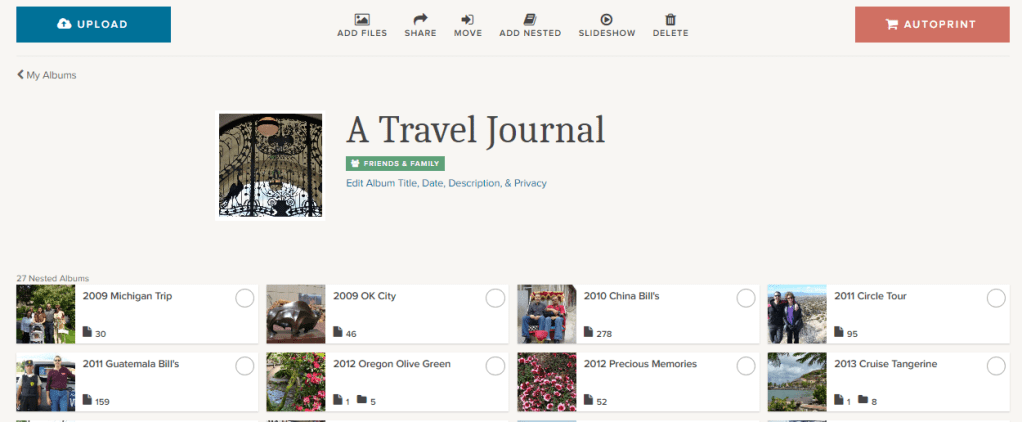
If you have already added files to an album, then it will select an image for the preview. It can be changed to whatever you want. If the album is new and there are no photos in the album, then the preview will be a blue box, but as soon as you add photos, one will be automatically selected. The green box at the bottom of the box tells you the level of privacy chosen for that album, how many images are in that album and how many albums are nested below it.
Each individual album on your Album page has a small blue box in the corner. If you click on that, a drop down box gives you several choices of things you can do with that album.
The first is “AutoPrint.” A few weeks ago I published a post about AutoPrint, which creates easy, quick projects almost like magic. If you select AutoPrint here, FOREVER will start building a project with the items in this album.
“Upload” allows you to upload images from your device directly to this albums.
“Add files” will take you to the Library so you can add images already on FOREVER to this particular album. It does not duplicate the photo, filling up your storage. All your photos live in the Library and are merely displayed in the various albums you create.
“Move” takes a photo out of an album and moves it to another one. As with Add Files, the images live in the Library. You’re just asking FOREVER to let you view this image in a a specific place.
“Delete” deletes the image. FOREVER will remind you the image is being moved to the delete bin and will be deleted in 60 days.
More Individual Album Options
If instead of clicking on the arrow as we did above, you click on the preview, you are given a peek at all the nested albums in the album and given many options, some you had on the outside of the album, but others as well.
You’ll find Upload, AutoPrint, Add Files, Move and Delete, which do the same thing as I described above, but you’ll find other options as well.

Click the “Share” button and this dialog button comes up. You can use it to share the entire album with someone with a share link. If you’d like for the person you share it with to be a collaborator, this is where you designate them.
The “Add Nested” button will add a new nested album to the album you are in. You will need to name it, but the Privacy Setting will automatically be the same as the album you are working in. You can add the other information as desired, but as I always say, the more info the better.
The “Slideshow” button will create a slideshow of all the images in the album, but will bein the slideshow, but it does not include the images in the nested albums within that album.
If you want to change the cover photo, click it and change it, but the image has to be in this album, not one of the nested album. You can also edit anything about the album with the “Edit ” button below the green box identifying the Privacy Setting.
If you click the circle on the left side of any of the nested items, you can then use any of the buttons I described above to perform that action in the nested items you’ve chosen. If you click anywhere else on the nested album, you will enter that nested album.
The only thing I have in my Top Level Albums are nested albums and the one image which is used as the cover photo. However, if you have multiple images in your album, you have more choices. Above this view are all the buttons I have previously described.
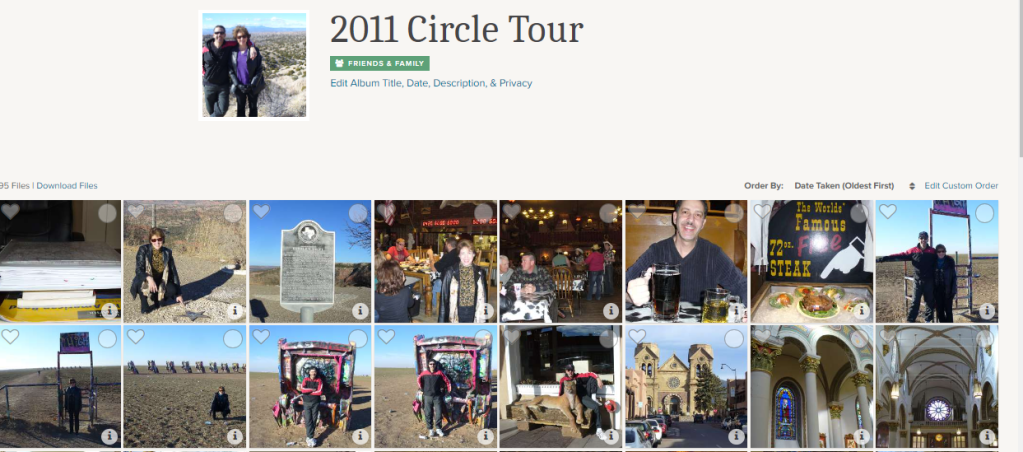
Notice on the right side, above the photos , it says “Order By.” When you click it, it allows you to choose the order based on the Date Taken or the Date Uploaded and you can select “Oldest First” or “Newest First.” That’s all the same as it is in the Library, but in your albums, you can also custom order the files according to your own preferences.

If you click on “Edit Custom Order,” you get a page like this that theoretically allows you to select the photos you want to move, then drag and drop them where you want. I say theoretically, because I’ve never been able to do that. I just click on a picture and try to drag it. I eventually get it to work, but I hope you have more luck. I am probably not holding my tongue right!
Whenever you are inside an album, you can chose favorites, by clicking the heart on the right side of a photo. If you use the circles on the left side, you are taken to a screen which will allow you to choose multiple images for a variety of operations shown below.
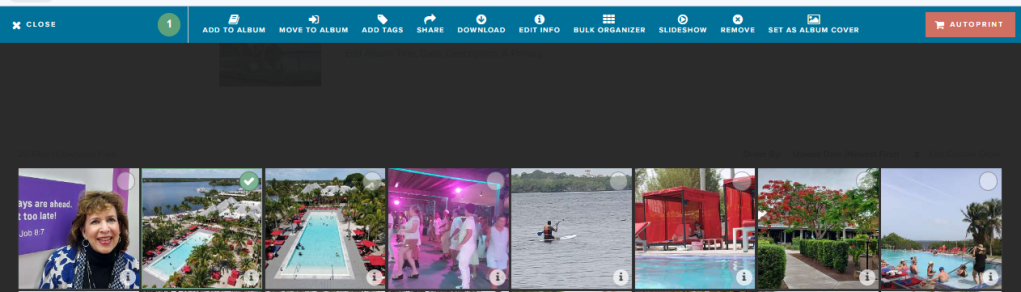
When you are in this screen you have access to many of the operations we have covered both a few weeks ago in the Library post and in this one, as well as some we haven’t seen before:
Add to Album will allow you to go get images from other albums you’d like to include in this album.
Move to Album takes the selected images out of this album and puts them in another.
Add Tags allows you to put shared tags on multiple images which you have selected.
Share is your tool for sharing a selection of photos with someone via a link.
Download is for adding photos from the album to your device.
Edit Info is a great place to change the name, description and/or date for selected image.
The Bulk Organizer is marvelous for quick curating of a number of photos at once. It will give you access to add the photos to another album, add tags, edit the names of a series of images, give a series of photos a description or change the dates of the photos. It is important to remember that what you do in bulk organizing overwrites whatever else you had input about the images, however, if you leave a section blank, it makes no changes. So, you could, for example, add tags and change dates, but leave everything else intact.
Slideshow lets you select images to include in a slideshow.
One of the more important buttons is Remove and this is the only place you’re going to find it. If you do not want to delete an image and it is already residing in other albums, then this button just takes it out of this nested album
Finally, Set as Album Cover allows you to choose an image to use as the cover of the album.
A Few Closing Thoughts
Though I have described the items in this post and the previous post on the Library from the standpoint of someone using FOREVER on a computer or laptop, most of these features are available on the app, just not in the exact format shown here. That means you can curate your albums on the go – waiting in the line to pick up your kids, sitting in a doctors waiting room, stuck in line at the grocery store or hanging at the pool.
Whether you are in the Library or in an Album, if you double click on an individual image you will be taken to a page on which you can provide info for that image. There is a lot of options there, so I will be covering those tools in a later post.
Finally, always remember I am here and happy to discuss your projects and challenges with you. If we need to ZOOM about something or sit down at your computer together (for local clients), let’s do it. Having access to your own Ambassador is part of what makes FOREVER so unique.
I’m here for you and so is the wonderful customer care staff at FOREVER. There is a comprehensive Help Center you can reach by scrolling to the bottom of any of the pages on the FOREVER site. Or you can just call or email. FOREVER’s Blog is a wealth of knowledge. Videos sprinkled throughout your Library, Albums and Tags will walk you though many processes. Or, like I said, I’m here, so just call me at 972-971-5263.


2 thoughts on “Digital Albums in FOREVER”