
MEMORY KEEPING 101: THE FOREVER LIBRARY, THAT IS
What’s a FOREVER Library?
OK, so FOREVER is a Digital Media resource that offers everything from Media Digitization to Video Streaming – but if you hang around me much, then you already know that.
The FOREVER Library is the place where all the stuff you’ve uploaded to FOREVER hangs out. It’s not the only place. You also have albums, as well as tags for sorting and finding your photos, but the library is where everything is all at the same time. You can upload directly to the library or to your albums. It doesn’t matter.
What Can It Do?
Your library can do a lot of cool things for you, so I decided to take a few minutes to introduce you to it’s features. Obviously, the great big blue “upload” button is the one you’d use for adding photos from your computer to your storage. If you want to add photos from your phone, there’s a free app for that. If your media is hard copy, we need to talk about digitization. See last week.
Next to it is a search bar. The effectiveness of your search bar is directly related to the thoroughness of your curating. The more information you have about your photos in FOREVER, the more accurately you can search. A sampling of the search terms you could use would be dates, titles and tags, but whatever you’ve got, FOREVER will try to deliver something.
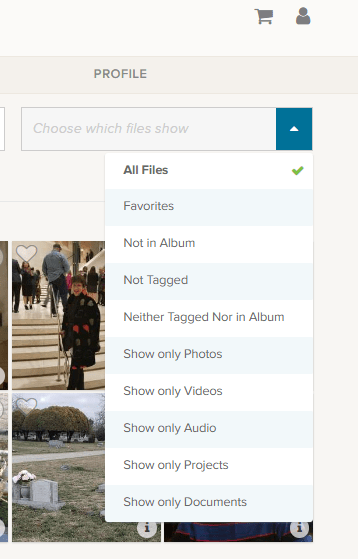
At the end of the upload and search area is a box that says “All Files”, but if you click the blue area you get these choices.
Obviously, All Files is all files. Favorites are photos you have marked with a heart. You can see an example of the heart on the left corner of the photo by the blue and white selection box.
The next are three very helpful choices as you begin to curate your images: “Not in Album,” “Not Tagged” and “Neither Tagged Nor in Album.” As you get your photos organized, labeled, tagged and such, the number of photos these choices will bring up will grow smaller.
I’m proud to say all but a handful of my photos are in Albums and all of those not in albums were taken in the last few days. I have my photos automatically added from my phone, by the app, when I take them. Then I delete them or add them to albums daily or weekly, according to the day and the week.
I’m working on the “Not Tagged”. Tagging is a great tool for searching. Some day I will have all the people and places tagged in every photos, so I can search by name or location to find any photo I want. So far, I have them all tagged as either Travel, At Home, Out & About, etc., but I have a long way to go. FOREVER recommends spending 15 minutes a day on this task and it’s a great idea.
Then there are a series of “Show Only” choices. With them you can see only photos, video or audio. You can also isolate documents in the collection. Projects are cool, because FOREVER keeps a copy of all the projects they do for you – the photobooks, photo gifts, greeting cards and such. These projects do not take up your storage space, but are always available to you.
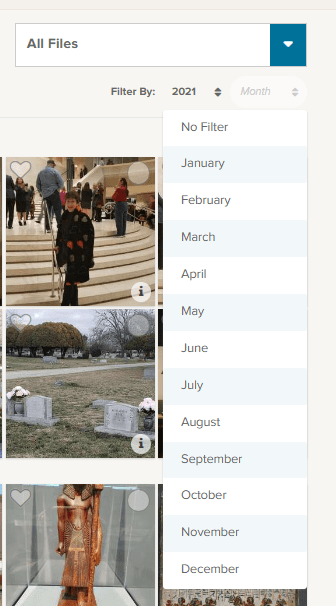
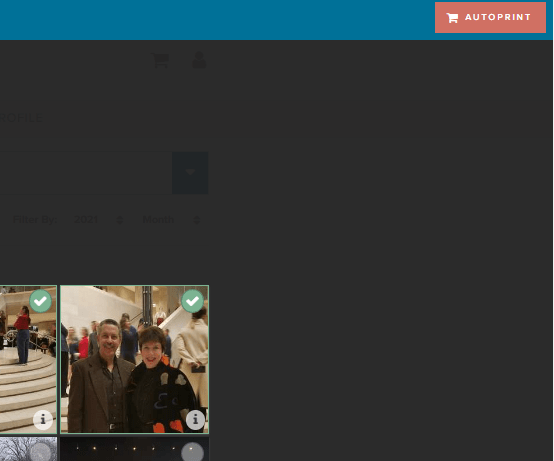
Under that selection box associated with “All Files” is a section where you can filter by both year and month. So, if you know you’re looking for the pictures of your husband’s 50th birthday, just select the year and the date of that celebration. In this image I chose 2021 for the year and have brought down the month selections.
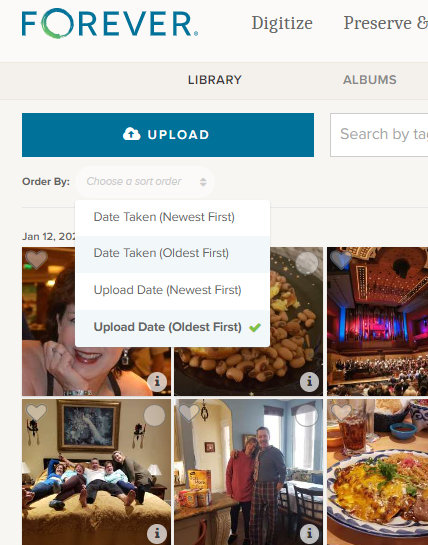
Moving to the other side, under the “upload” button, you find the “Order By” selections. I tend to leave it on Date Taken (Oldest First) because I think in chronological order, but you can reverse it and as for (Newest First) if you are looking for something taken recently.
Sometimes you aren’t as concerned with when it was taken as you are when it was uploaded and the next choices cover that.
Other Things to do in the Library
Returning to the picture at the top, you’ll notice that each individual photo has a heart and a circle at the top. The heart, as I mentioned above, allows you to mark your favorites and you can always choose to have the Library show those to you. The circle allows you to select images for curating. Let me show you.
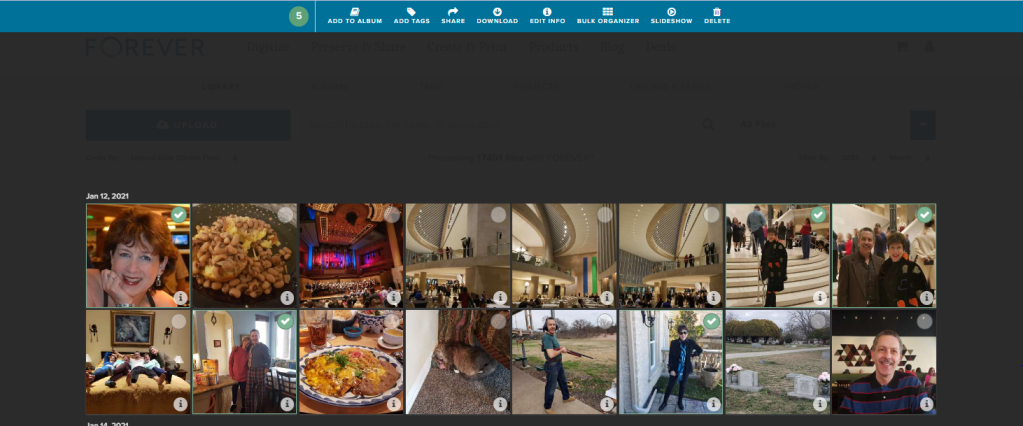
On the main Library page, I checked a picture and the screen above opened up, giving me new choices. I went ahead and selected all the pictures I was in, on the first date available, but I could have chosen every picture of me in the library, all the pictures on that date or even just one photo at a time to work on.

If I chose “Add to Album,” I would get this screen. It allows me to either set up a new album, add the selected photos to a top level album or with the “View Nested” arrow, I could actually add them to albums which are “nested” under the main album.
If I chose “Add Tags,” then I could add tags common to all five of those photos. Obviously, since I chose pictures of myself, I could tag them “Jane Sadek,” but you are allowed an unlimited number of tags, so people are only the beginning. And you can do more than one tag at a time, so if I had three ways of identifying all these photos, I would add all three tags. They could either be tags I had already created or I could create them using this tool.

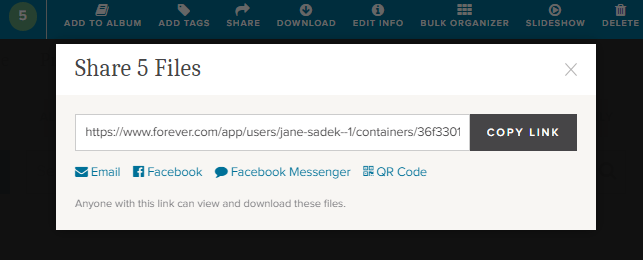
Also from the Library you can share photos with other people. You can select as many photos as you like and then either share the link which is created or create an email or a post or message for Facebook. You can even create a QR code. How cool is that!
There’s a “Download” button next and when you click it, you’ll be linked immediately to your browser. Select where you want the photos to be saved and save. You’ll have a copy of these photos on your computer.
The “Delete” button (at the far end) will bring up a screen which asks if you want to delete photos. If you do, it will put them in your FOREVER delete bin for 60 Days.
Now this is a good one. The “Edit Info” button allows you to change the basic information on a file. You know how photos come from your camera with vague names like IMG 36 or a string of numbers. Well, you can change it to a more specific title like Jane in Dallas 2021 or whatever name would be more useful.
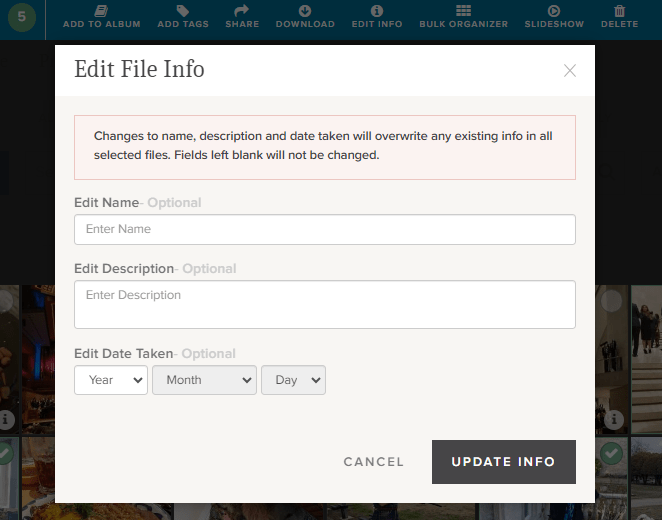
You can also provide a description of the photo here. You could explain who Jane was, what she was doing in Dallas, what your relationship to her is – whatever you want. In fact, while the description boxes you run into with many programs have a 25 word or 100 character limit, this description can go on for as long as you’d like it to.
You can also edit or add a date. Sometimes our devices try hard to fill in blanks and provide a Date Taken which has no basis in reality.
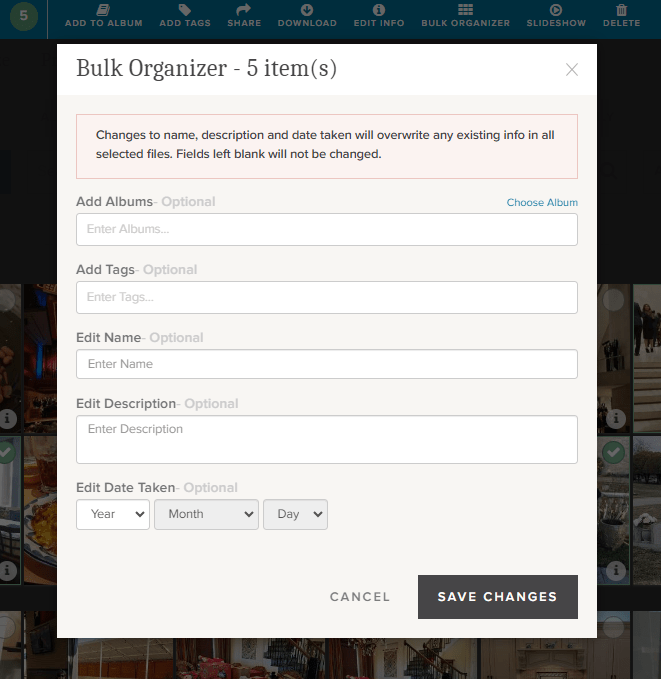
If you’re loading a whole bunch of photos to your storage, the Bulk Organizer could be your best friend. You could do the whole curating job in one fell swoop. You just have to remember that whatever you put here will override anything else you might have in the metadata.
You can make changes to all of these sections or just choose those you want.
One more choice. Perhaps you’d like to select a group of photos for a slideshow. Well, there’s a “Slideshow” button. It will autoplay whatever you’ve selected and you can even put it on “Loop” so you can play it continuously.
Well, there is one more thing you can do from this screen. You see that brick colored square that says “AUTOPRINT”? Well, this could be step one for your next print project. Just select all the images you want to include in a digital photobook, photogift or perhaps you’d just like to print some copies to share.
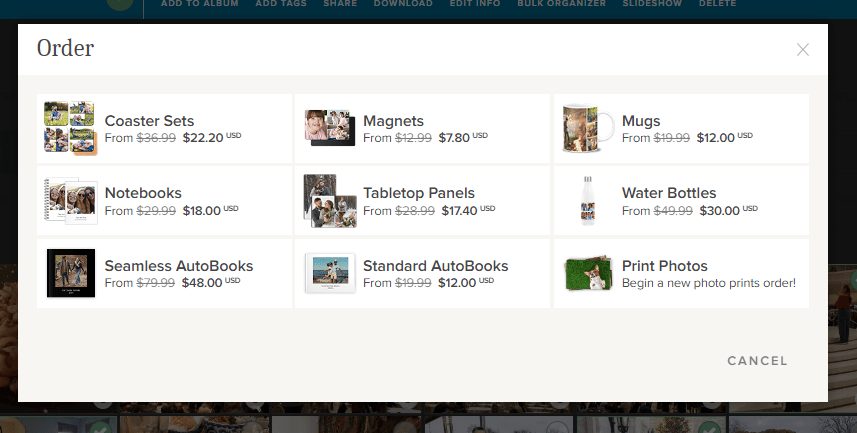
The AUTOPRINT buttons connects you directly with the various potential projects in Autoprint. That’s where FOREVER does most of the work, like magic. You select the images and the project. FOREVER will do the rest. You’ll be given the opportunity to do some minor editing, if you chose, then all you have to do is pay for it and select your delivery method and address. You can have custom projects ready in seconds!
Wrapping It All Up in the Library
Most of these same features are available in the FOREVER app, as well as on the website, as I have shown them here. You just find them in different places. Personally, I enjoy working on files in the Library when I’m at my desktop or using my laptop, but I’ve heard of people who curate their entire collection of media on their phone, sitting by the pool, drinking a cool adult beverage.
It’s up to you. If, while you are in the Library on your computer, you need a reminder about any particular images, just hover over the “i” in the bottom right of any images. A small black and white screen will pop up to show you what FOREVER knows.
And that’s all there is to it. I plan to write similar posts about Albums, Tagging and the App in the coming months, but next week we’re going to AutoPrint. Start thinking about a project you’d like to have completed quickly – like magic.


3 thoughts on “Let’s Talk About the Library”